
使用docker部署项目,需要把项目代码加入到docker中,然后应用通过拉取docker镜像运行应用。为了减少风险和方便管理,我们可以使用harbor创建属于自己的私有仓库,第一所有镜像存储在本地,发布版本可以直接在harbor上拉取镜像,所有环境均属于公司环境定制。不过这里有一个问题需要注意,如果我们的节点比较多的话在拉取的时候一个harbor会出现不够用的情况,这个时候就需要高负责,不过后面有高负载的方法。
Harbor安装
这里先不说Harbor的原理问题,因为安装完之后我们才能更容易理解原理,这里使用一台服务安装Harbor,高可用可以使用Harbor的复制功能,把主数据同步到备份仓库里,这种方式虽然可以做高可用,但是不太推荐。因为一旦两台只是镜像的同步,还是相当于两个独立的仓库,一个节点出现问题另一个节点的数据就无法同步过来,就是启动之后也不一定能够自动同步,所以在生产环境中不太建议使用这种方式做高可用,下面会介绍这种方法:
环境准备:
[root@wulaoer ~]# yum install -y yum-utils device-mapper-persistent-data lvm2
[root@wulaoer ~]# yum-config-manager --add-repo http://mirrors.aliyun.com/docker-ce/linux/centos/docker-ce.repo
[root@wulaoer ~]# yum install -y docker-ce-17.12.1.ce
[root@wulaoer ~]# systemctl start docker
[root@wulaoer ~]# systemctl enable docker
Created symlink from /etc/systemd/system/multi-user.target.wants/docker.service to /usr/lib/systemd/system/docker.service.
因为仓库中保存的都是镜像文件,所以需要安装docker。docker安装完成之后需要管理容器,可以使用docker-compose进行容器管理,也可以解决docker的run层面的很多问题,如:网络,数据卷,执行指令,环境变量,资源限制等等。有了docker-compose可以一键重启,关闭,删除,监控所有的docker服务,只需要配置一次就可以对容器进行统一管理。
docker-compose安装方法:
第一种:
[root@wulaoer ~]# curl -L https://get.daocloud.io/docker/compose/releases/download/1.12.0/docker-compose-`uname -s`-`uname -m` > /usr/local/bin/docker-compose
[root@wulaoer ~]# chmod +x /usr/local/bin/docker-compose
[root@wulaoer ~]# docker-compose version # 查看版本号,测试是否安装成功
根据自己的需求选择适合自己的版本,
第二种
[root@wulaoer ~]# yum -y install epel-release     #安装需要的源
[root@wulaoer ~]# yum -y install python-pip          #安装pip
[root@wulaoer ~]# pip install docker-compose      #安装docker-compose
[root@k8s-node3 harbor]# docker-compose version   #查看版本
下载Harbor文件,解压并安装:
[root@wulaoer ~]# wget https://storage.googleapis.com/harbor-releases/release-1.9.0/harbor-offline-installer-v1.9.1-rc1.tgz
[root@wulaoer ~]# tar -zxf harbor-offline-installer-v1.9.1-rc1.tgz
查看一下基本配置:
[root@wulaoer ~]# cd harbor
[root@wulaoer harbor]# cat harbor.yml
# Configuration file of Harbor

# The IP address or hostname to access admin UI and registry service.
# DO NOT use localhost or 127.0.0.1, because Harbor needs to be accessed by external clients.
hostname: 10.211.55.41         #定义本机IP,允许所有用户访问

# http related config
http:
  # port for http, default is 80. If https enabled, this port will redirect to https port
  port: 80             #端口

# https related config
# https:
#   # https port for harbor, default is 443
#   port: 443
#   # The path of cert and key files for nginx
#   certificate: /your/certificate/path
#   private_key: /your/private/key/path

# Uncomment external_url if you want to enable external proxy
# And when it enabled the hostname will no longer used
# external_url: https://reg.mydomain.com:8433

# The initial password of Harbor admin
# It only works in first time to install harbor
# Remember Change the admin password from UI after launching Harbor.
harbor_admin_password: Harbor12345         #默认admin的密码

# Harbor DB configuration
database:
  # The password for the root user of Harbor DB. Change this before any production use.
  password: root123     #数据库密码
  # The maximum number of connections in the idle connection pool. If it <=0, no idle connections are retained.
  max_idle_conns: 50
  # The maximum number of open connections to the database. If it <= 0, then there is no limit on the number of open connections.
  # Note: the default number of connections is 100 for postgres.
  max_open_conns: 100

# The default data volume
data_volume: /data                       #数据存储位置

# Harbor Storage settings by default is using /data dir on local filesystem
# Uncomment storage_service setting If you want to using external storage
# storage_service:
#   # ca_bundle is the path to the custom root ca certificate, which will be injected into the truststore
#   # of registry's and chart repository's containers.  This is usually needed when the user hosts a internal storage with self signed certificate.
#   ca_bundle:

#   # storage backend, default is filesystem, options include filesystem, azure, gcs, s3, swift and oss
#   # for more info about this configuration please refer https://docs.docker.com/registry/configuration/
#   filesystem:
#     maxthreads: 100
#   # set disable to true when you want to disable registry redirect
#   redirect:
#     disabled: false

# Clair configuration
clair:
  # The interval of clair updaters, the unit is hour, set to 0 to disable the updaters.
  updaters_interval: 12

jobservice:
  # Maximum number of job workers in job service
  max_job_workers: 10

notification:
  # Maximum retry count for webhook job
  webhook_job_max_retry: 10

chart:
  # Change the value of absolute_url to enabled can enable absolute url in chart
  absolute_url: disabled

# Log configurations
log:
  # options are debug, info, warning, error, fatal
  level: info
  # configs for logs in local storage
  local:
    # Log files are rotated log_rotate_count times before being removed. If count is 0, old versions are removed rather than rotated.
    rotate_count: 50
    # Log files are rotated only if they grow bigger than log_rotate_size bytes. If size is followed by k, the size is assumed to be in kilobytes.
    # If the M is used, the size is in megabytes, and if G is used, the size is in gigabytes. So size 100, size 100k, size 100M and size 100G
    # are all valid.
    rotate_size: 200M
    # The directory on your host that store log
    location: /var/log/harbor          #日志

  # Uncomment following lines to enable external syslog endpoint.
  # external_endpoint:
  #   # protocol used to transmit log to external endpoint, options is tcp or udp
  #   protocol: tcp
  #   # The host of external endpoint
  #   host: localhost
  #   # Port of external endpoint
  #   port: 5140

#This attribute is for migrator to detect the version of the .cfg file, DO NOT MODIFY!
_version: 1.9.0

# Uncomment external_database if using external database.
# external_database:
#   harbor:
#     host: harbor_db_host
#     port: harbor_db_port
#     db_name: harbor_db_name
#     username: harbor_db_username
#     password: harbor_db_password
#     ssl_mode: disable
#     max_idle_conns: 2
#     max_open_conns: 0
#   clair:
#     host: clair_db_host
#     port: clair_db_port
#     db_name: clair_db_name
#     username: clair_db_username
#     password: clair_db_password
#     ssl_mode: disable
#   notary_signer:
#     host: notary_signer_db_host
#     port: notary_signer_db_port
#     db_name: notary_signer_db_name
#     username: notary_signer_db_username
#     password: notary_signer_db_password
#     ssl_mode: disable
#   notary_server:
#     host: notary_server_db_host
#     port: notary_server_db_port
#     db_name: notary_server_db_name
#     username: notary_server_db_username
#     password: notary_server_db_password
#     ssl_mode: disable

# Uncomment external_redis if using external Redis server
# external_redis:
#   host: redis
#   port: 6379
#   password:
#   # db_index 0 is for core, it's unchangeable
#   registry_db_index: 1
#   jobservice_db_index: 2
#   chartmuseum_db_index: 3

# Uncomment uaa for trusting the certificate of uaa instance that is hosted via self-signed cert.
# uaa:
#   ca_file: /path/to/ca

# Global proxy
# Config http proxy for components, e.g. http://my.proxy.com:3128
# Components doesn't need to connect to each others via http proxy.
# Remove component from `components` array if want disable proxy
# for it. If you want use proxy for replication, MUST enable proxy
# for core and jobservice, and set `http_proxy` and `https_proxy`.
# Add domain to the `no_proxy` field, when you want disable proxy
# for some special registry.
proxy:
  http_proxy:
  https_proxy:
  no_proxy: 127.0.0.1,localhost,.local,.internal,log,db,redis,nginx,core,portal,postgresql,jobservice,registry,registryctl,clair
  components:
    - core
    - jobservice
    - clair
[root@wulaoer harbor]#
根据自己的需求修改相应的配置,安装harbor。
[root@wulaoer harbor]# ./prepare       #加载修改的配置文件
[root@wulaoer harbor]# ./install.sh
重启一下docker-compose
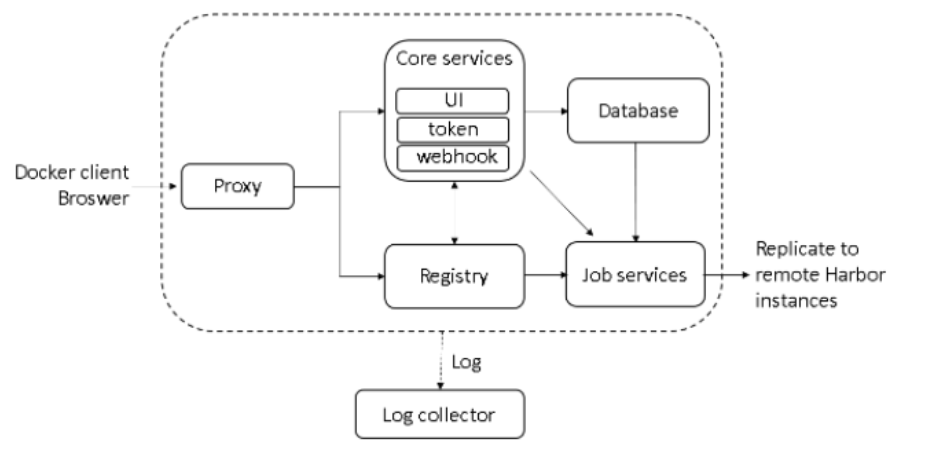
[root@wulaoer harbor]# docker-compose restart      #这里注意可以先关闭在启动,也可以重启如果报错,在执行一次重启
Restarting nginx             ... done        #harbor的反响代理组件
Restarting harbor-jobservice ... done        #负责镜像复制工作
Restarting harbor-core       ... done        #是Harbor的核心功能,主要提供UI、webhook、token
Restarting harbor-portal     ... done        #Harbor的registry, UI, token等服务,通过一个前置的反向代理统一接收浏览器、Docker客户端的请求,并将请求转发给后端不同的服务。
Restarting registry          ... done        #镜像仓库,负责存储镜像文件
Restarting redis             ... done        #存储缓存信息
Restarting registryctl       ... done        #主要提供操作registry的api接口
Restarting harbor-db         ... done        #负责存储用户权限,审计日志,Dockerimage分组信息等数据
Restarting harbor-log        ... done        #为了帮助Harbor运行,负责手机其他组件的log,供日后分析
docker-compose的重启方式:
[root@wulaoer harbor]# docker-compose up -d  #启动
[root@wulaoer harbor]# docker-compose down -v #关闭
这就是整个Harbor的应用,我们在看一下官方提供的原理图,是否能够会更明白一点
测试一下
在本地pull一个镜像,然后tag一个分支推送到harbor上是否成功。下拉取一个镜像,看是否拉取成功:
[root@wulaoer harbor]# docker pull cirros
Using default tag: latest
latest: Pulling from library/cirros
3d6427f49fe3: Pull complete
1915bfe8159b: Pull complete
d0ec9ef25b96: Pull complete
Digest: sha256:8654d33ecbcdc8fd65c80325c3ec3b1bc938dfad9f20d1a2e3cf21e521ab70e6
Status: Downloaded newer image for cirros:latest
这里tag一个分支(注意,tage分支前的wulaoer是在harbor上创建的项目名称),登录前后都可以,分支和原镜像IMAGE ID是一样的,这个需要注意。
[root@wulaoer harbor]# docker login 10.211.55.41
Username (admin): admin
Password:
Login Succeeded
[root@wulaoer harbor]# docker tag cirros:latest 10.211.55.41/wulaoer/cirros:test1
[root@wulaoer harbor]# docker images
REPOSITORY                      TAG                             IMAGE ID            CREATED             SIZE
goharbor/chartmuseum-photon     v0.9.0-v1.9.1                   0aa7451af9b8        2 weeks ago         131MB
goharbor/harbor-migrator        v1.9.1                          a83f1be1ec94        2 weeks ago         362MB
goharbor/redis-photon           v1.9.1                          4d8d79a557df        2 weeks ago         110MB
goharbor/clair-photon           v2.0.9-v1.9.1                   98b318ca3cb0        2 weeks ago         165MB
goharbor/notary-server-photon   v0.6.1-v1.9.1                   78dac4ed14d8        2 weeks ago         138MB
goharbor/notary-signer-photon   v0.6.1-v1.9.1                   5d9f413e14a8        2 weeks ago         135MB
goharbor/harbor-registryctl     v1.9.1                          f4b2b72cdf71        2 weeks ago         99.6MB
goharbor/registry-photon        v2.7.1-patch-2819-2553-v1.9.1   d460d658f383        2 weeks ago         82.3MB
goharbor/nginx-photon           v1.9.1                          0db1e12b9d30        2 weeks ago         43.9MB
goharbor/harbor-log             v1.9.1                          368dd79ef99f        2 weeks ago         82.6MB
goharbor/harbor-jobservice      v1.9.1                          71d4a3eaff94        2 weeks ago         141MB
goharbor/harbor-core            v1.9.1                          d105210d9924        2 weeks ago         155MB
goharbor/harbor-portal          v1.9.1                          2dced1823043        2 weeks ago         51.3MB
goharbor/harbor-db              v1.9.1                          91784692a954        2 weeks ago         147MB
goharbor/prepare                v1.9.1                          44775181c88d        2 weeks ago         148MB
10.211.55.41/wulaoer/cirros     test1                           bc94bceaae77        9 months ago        10.3MB
cirros                          latest                          bc94bceaae77        9 months ago        10.3MB
扩展一下,登录命令:
docker login -u admin -p admin 10.211.55.41
tag一个分支后,把tag的分支推送到harbor上,如果没有登录一定要登录。
[root@wulaoer harbor]# docker push 10.211.55.41/wulaoer/cirros:test1
The push refers to repository [10.211.55.41/wulaoer/cirros]
abbd6d6ac643: Pushed
75b99987219d: Pushed
0cc237193a30: Pushed
test1: digest: sha256:96137d51e0e46006243fa2403723eb47f67818802d1175b5cde7eaa7f19446bd size: 943
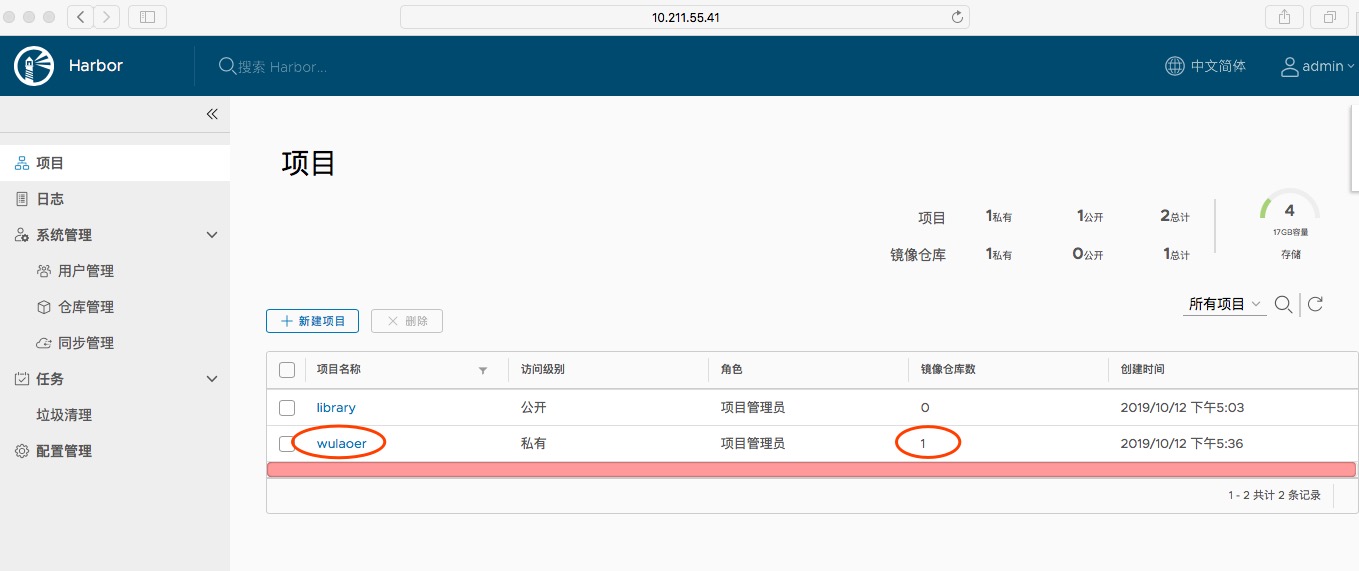
使用浏览器登录Harbor,查看一下wulaoer项目下是否有镜像文件存在,如果有说明推送成功,没有就推送失败,使用命令登录后在推送一次。
Harbor已经搭建完成,如何拉取镜像,先把原来的镜像删除,在直接拉取镜像。
[root@k8s-node3 harbor]# docker rmi -f bc94bceaae77  #IMAGE ID
[root@k8s-node3 harbor]# docker pull 10.211.55.41/wulaoer/cirros:test1
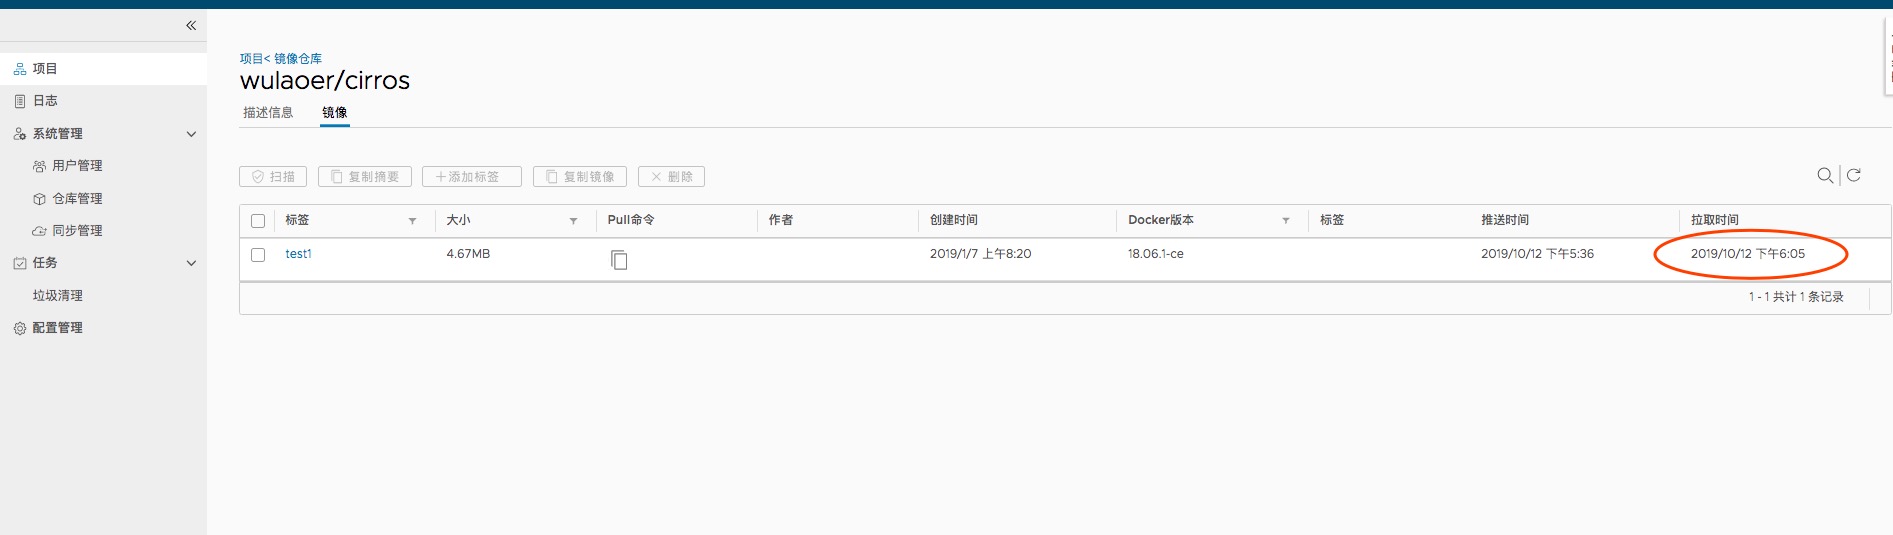
我们登录一下harbor查看一下拉取时间。
高可用方法:
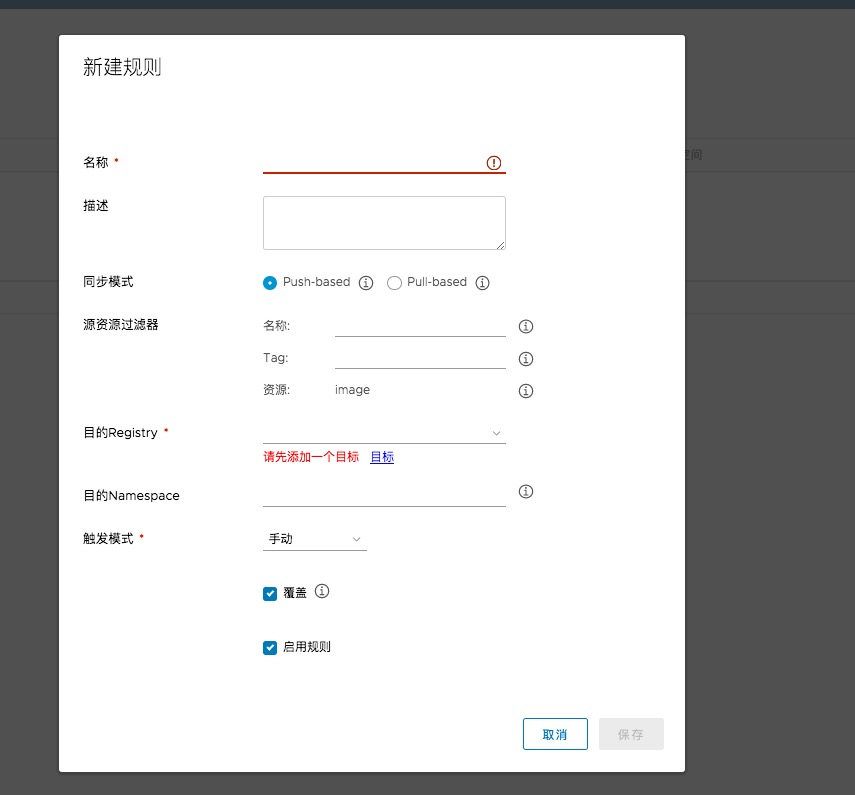
登录到Harbor之后在同步管理中创建同步规则如下:
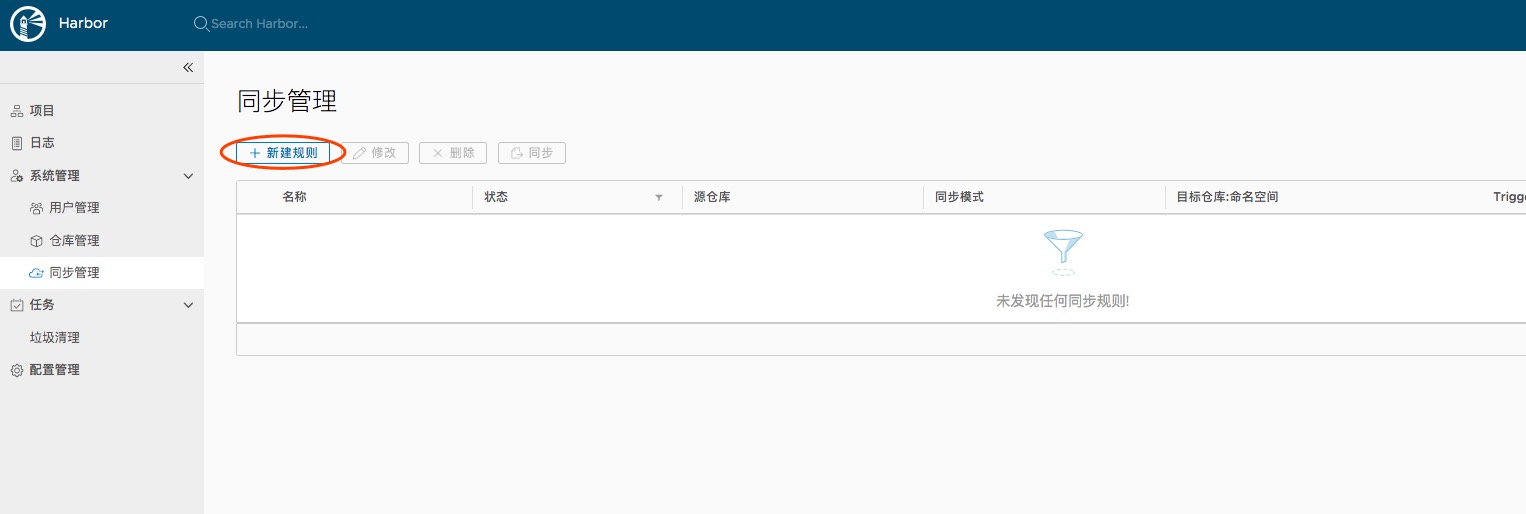
在名称中创建规则名字,可以简单做一个描述。同步方式有两种一种是推送一种拉取,根据主和被选择,源资源过滤器根据需求选择不通的tag和名称。注意目的Registry中需要在仓库管理中选择一个需要同步的目标harbor连接信息。可以选择触发方式等。
问题解决方法:
[root@wulaoer harbor]# docker login 10.211.55.41
Username: admin
Password:
Error response from daemon: Get https://10.211.55.41/v2/: dial tcp 10.211.55.41:443: getsockopt: connection refused
解决方法:
[root@wulaoer harbor]# vi /usr/lib/systemd/system/docker.service
.......
ExecStart=/usr/bin/dockerd --insecure-registry=10.211.55.41
ExecStartPost=/sbin/iptables -I FORWARD -s 0.0.0.0/0 -j ACCEPT     #如果关闭了防火墙可以忽略
...........
重启一下服务
[root@wulaoer harbor]# systemctl restart docker
[root@wulaoer harbor]# ./install.sh
重新测试
[root@wulaoer harbor]# docker login 10.211.55.41
Username: admin
Password:
Login Succeeded
至此,整个流程搭建完了,这里需要注意,不建议使用这种高可以在生产环境中。
您可以选择一种方式赞助本站
支付宝扫一扫赞助
微信钱包扫描赞助
赏